Latest Post

How to setup FTP server in Windows 7

In Windows 7, you can share files on home network easily using Home Group but creating an FTP server gives you many benefits. The FTP can also be accessed by other Operating Systems in the network, You can also configure it to be accessed from anywhere through internet. In this short tutorial, I will guide you to make an FTP Server on Windows 7 for LAN. 
Let's do step by step:

Step 1:  Open control panel  and then click on Programs.


Step 2:  In Programs, click on Turn Windows features on or off.


Step 3:  After clicking Turn Windows features on or off you will see a new window. Find Internet information Services and mark check on it and then click OK button and restart the System.

Step 4:  Open the Control Panel and set the  category to small icons and click on the Administrative Tool.


Step 5:  Click on  Administrative Tool


Step 6: Under Administrative Tool click on Internet Information Services (IIS) Manager.


Step 7: Here the actual ftp setup starts. Now right click on Site icon and select the Add FTP site Option.


Step 8:  Now give the name to FTP and Select the folder name from the Browse Button.


Step 9:  Select the IP address of your FTP from the list which is provided by the OS and set SSL to No SSL .


Step 10:  Select Authentication mode to Anonymous, Access to All users and give the Permissions for 
client i.e R/W . 
  

Step 11:  Add the FTP Exception to the firewall. To add this Open the firewall settings click on Allow a program or Feature through Windows Firewall.


Step 12:  Now check the both CheckBox for FTP server and click on OK.


Step 13:  To check the how FTP work goto Run and type the Address of your FTP server followed by ftp:// or you can directly add this address to the URL of the Web browser to Open FTP.


Step 14:  Now you can see the All the content of the FTP folder in the Web Browser and you can download it also. 


-------------------------------Enjoy--------If you have any question you can aks---------------------------
 

Crack Windows xp/7/8 Password Using BACKTRACK 5 R3

Hi friends, Today in this post we are going to see how to crack the Windows Password Using the latest version of backtrack 5 r3.(You can Download BACKTRACK 5 R3 Here)

Basic Requirements :

  1. Bootable Pendrive or DVD of  BACKTRACK 5 R3.  (Click Here to make Bootable Pendrive Of Backtrack 5)
  2. Knowledge of Basic CMD commands.
Follow the Below Steps to Crack Windows Password :

Step1:  Boot the BACKTRACK from the Bootable Pendrive or DVD of  BACKTRACK.

Step2:  After Backtrack totally loaded open the Terminal feature of backtrack.


Step3:  Simply run the following command given in following Capture:


Step 4: After All the commands are Successfully Executed then shutdown the Backtrack and run the windows whose password you want to crack:

Step 5: When windows ask for password click on the Utility Icon, it runs the CMD window and type the command i.e. "net user" which shows all the user associated with the windows. After this type the command "net user <User_Name>  *" and hit enter. Now this ask for new password, Enter new password and restart System . After restart,You can get Log In into Windows with your new password :


Note : For more Detail of these commands click here.


Speed Up Your PC and Remove Unwanted Files With "CCleaner"


CCleaner is a software for computers which is running on Microsoft Windows platform that cleans out the 'junk' that accumulates over time: temporary files, broken shortcuts, and other problems.
CCleaner protects your privacy. It cleans your browsing history and temporary internet files. Allowing you to be a more confident Internet user and less susceptible to identity theft.
CCleaner can clean unneeded files from various programs saving you hard disk space, remove unneeded entries in the Windows Registry, help you uninstall software and select which programs start with Windows.

Some Ccleaner Features :

Privacy: Delete passwords, Internet files, configuration files, and remove System Restore points from a shared PC.
Security: Clean out files from a PC you're giving away or selling. You can also wipe free space so the remnants of any files you deleted previously will be erased forever.
Speed: Speed up your computer by removing unneeded files. Speed up boot times by reducing the number of programs that start with Windows.
Stability: Enable Windows to run more smoothly with a clean Registry.
Space: Free up hard drive space by deleting unnecessary files. Detect and remove duplicate files that clutter up your PC.


Download Windows 7 Ultimate/Professional/Home Premium Here.


Four years before when i purchased an old PC i was asking some of my known persons to

 give me Windows XP cd so that i can reinstall XP but they refused. Today in my town i am well known for my largest collection of various software and Operating Systems. The best thing about these software are i have downloaded almost all of them. So today they asks me help out..
Many times you needs a OS Bootable cd/dvd to format your PC but you don’t have & your friend refuses to help. This is the time to make your own Windows 7 DVD without any deep knowledge, an Original Window DVD. Today I am posting Links to download Original Windows 7 ISO image. To install it in your pc you just have to burn that image on a DVD.
Visit the Links posted below & download the version according to your requirement…


Windows 7 : 32bit :


Windows 7 : 64bit


Note:  You will get Original Windows 7 SP1 ISO image from Microsoft Server. After Installing you will get standard Windows 7 Trial to crack trial click on Below Link.


Windows 8 : Download & Installation

Windows 8 is one of the most awaited operating system form Microsoft due to its faster Booting & much more rich Visuals. Touch support in PC is demand of new generation we can tell that it is starting of TAB PC Era That's why Microsoft extended touch support in every windows to every corner in Windows 8. To provide batter touch experience Microsoft providing Windows 8 Developer Preview to make market full of Windows 8 application before it’s official launching for everyday users. But as all of us can’t wait for launching we can test Windows 8 Developer Preview in our PC with some precautions.
Here are the direct download links for windows 8 Developer Preview from Microsoft official server

Windows 8 Developer Preview with developer tools : English : 64 Bit : 4.8 GB
Windows 8 Developer Preview : English : 64 Bit : 3.6 GB
Windows 8 Developer Preview : English : 32 Bit

System Requirements

The Windows 8 Developer Preview works great on the same hardware that powers Windows Vista and Windows 7:
  • 1 gigahertz (GHz) or faster 32-bit (x86) or 64-bit (x64) processor
  • 1 gigabyte (GB) RAM (32-bit) or 2 GB RAM (64-bit)
  • 16 GB available hard disk space (32-bit) or 20 GB (64-bit)
  • DirectX 9 graphics device with WDDM 1.0 or higher driver
  • Taking advantage of touch input requires a screen that supports multi-touch
  • To run Metro style Apps, you need a screen resolution of 1024 X 768 or greater

Download version according to your needs & Enjoy
 

Windows Xp Service Packs 3 Master Registration Key


Some list of Master product key of Windows Xp Service Packs 3, Try out these :

  • HRXTR-FKTCV-X8QCH-D7PTH-KYYPB
  • KXMPR-2CDKM-W4QG8-VPQYX-RB4WQ
  • RHKG3 8YW4W 4RHJG 83M4Y 7X9GW
  • VDDF2-JJWM3-X7P27-FRHRT-8BVHT

I hope this will help you.....


Change MAC Address Of Your System With " Technitium MAC Address Changer "

Technitium MAC Address Changer helps you to change or spoof the Media Access Control (MAC) Address of your Network Interface Card (NIC) irrespective to your NIC manufacturer. It has a very simple user interface and provides all information regarding each NIC in the machine. Every NIC has a MAC address hard coded in its circuit by the manufacturer. This hard coded MAC address is used by windows drivers to access Ethernet Network (LAN). This tool can set a new MAC address to your NIC, bypassing the original hard coded MAC address. Technitium MAC Address Changer is a must tool in every security professionals tool box.

Features
  • Internet Protocol v6 (IPv6) support added.
  • Works on Windows 7 and Windows 8 for both 32-bit and 64-bit.
  • Automatic Update feature added to update software to latest available version.
  • Update network card vendors list feature allows you to download latest vendor data (OUI) from IEEE.org.
  • Enhanced network configuration presets with IPv6 support allow you to quickly switch between network configurations.
  • Command line options with entire software functionality available. You can select a preset from specified preset file to apply directly.
  • Issues in previous version ironed out.

DOWNLOAD


BackTrack 5 R3 Released


BackTrack 5 R3 Released! Aug 13th, 2012 
You can download the various flavours of backtrack. The new and latest version of the BackTrack is BackTrack 5 R3. BackTrack 5 R3 comes with the various new tools which are more powerful than the old version of Backtrack You can download it from the official website of BackTrack

http://www.backtrack-linux.org/downloads/ 


Protect Your Facebook, Gmail And Other Accounts From Hackers With Antilogger.

Zemana AntiLogger is a powerful, efficient, and lightweight app that blocks different hacking attacks. It detects any attempts to modify your computer’s settings, record your activities, Keep Watch to your PC’s sensitive processes, or inject malicious code in your system.
The AntiLogger is designed to work with any anti-virus. While an anti-virus software will protect you against a wide range of known forms of malware, the AntiLogger is able to stop advanced, new, and niche threats developed with a specific objective: to steal your private information or access your secure internet connections.
The free version of  Zemana AntiLogger is also available for download.

You Can Download Zemana AntiLogger Here
 

Download YUMI-0.1.0.7– Multiboot USB Creator For Windows.

DOWNLOAD

 YUMI (Your Universal Multiboot Installer), is the successor to MultibootISOs. It can be used to create a Multiboot USB Flash Drive containing multiple operating systems, antivirus utilities, disc cloning, diagnostic tools, and more. Contrary to MultiBootISO's which used grub to boot ISO files directly from USB, YUMI uses syslinux to boot extracted distributions stored on the USB device, and reverts to using grub to Boot Multiple ISO files from USB, if necessary.

DOWNLOAD


Make Bootable Live USB Of BACKTRACK 5 R3 With "YUMI 0.1.0.7"

Required Tools and Software :
  1. USB Thumb Drive of Minimum 4GB
  2. Download, .ISO of Backtrack 5 R3
  3. Download, YUMI 0.1.0.7 Tool

 Make Bootable Live USB Of BACKTRACK 5 R3 Follow the Below Steps:

Step1.  Download and save the BACKTRACK 5 R3 .ISO Image file. (To Download Latest version of BACKTRACK 5 R3 Click Here)

Step2.  Download YUMI 0.1.0.7 Tool , run it and follow all the instruction given below (To Download Latest version of YUMI 0.1.0.7 Tool Click Here) :

 1.  Click On I Agree Button :


2.  Select USB Device (Mini 4 GB) from The List and also select the OS from the list of OS's provided by the YUMI Boot Tool, Here we are going to boot the BACKTRACK 5 R3 hence select BackTrack from the list and Browse the .iso file of Backtrack 5 R3 as given below :


 3.  Select Backtrack 5 R3 .iso file from HardDrive By Clicking on Browse Button :


4.  After selecting BackTrack 5 R3 ISO click on Create Button.


5.  Then click on Yes Button.


6. Wait Until the Process Finishes.
 

After the Process Finishes your USB Device is ready  to Boot BackTrack 5 R3 From USB.

To Run this BackTrack 5 R3 From USB, Set First Bootable Devise To USB in BIOS BOOT Sequence.
If you have any Question or problem You can Comment below.......
                                                        Enjoy!!!!!!!!!!!!!!
 

BackTrack 5 R3: Black Screen After Startx/Caps Lock Blinks/USB Thumb Drive Boot Problem

Well, I have to say up front, this took me a couple of hours to resolve.  It appears that this issue is quite common, but I found, literally no complete resolution to this issue anywhere on the Internet.  Here is what I tried to do:
I was trying to make a bootable USB drive with BackTrack 5 R3 on it.  Here is what I did to get that done:


1.  Get unetbootin and the ISO of backtrack.
2.  Run unetbootin and select the ISO of backtrack and the USB stick you want to use.
3.  Run the program and wait for it to finish.


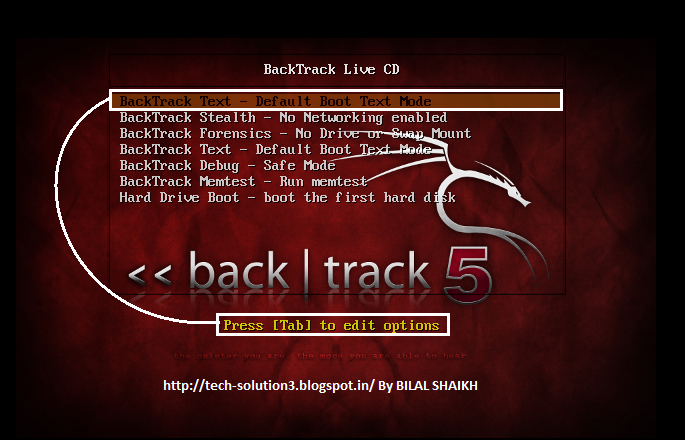
This worked, except that it wouldn't boot after typing in 'startx".  It would just freeze up, black screen, and caps lock blinking steadily.  It wouldnt go any further.  From my research into this, it appears to be a video driver issue.  Im running a Lenovo G560 .  There appears to be fixes out there, but because Im running this on a USB drive, none of them were permanent fixes.  This is the fix that actually got me to realize that the my USB install was ok, and that this was a video driver issue (I found this in the BackTrack forums, posted by p0cTeam):quote: insert DVD-live, in the grub press TAB to edit boot, you well see something like this 

Step 1: Press Tab Here As Given Below :


Step 2 : Append :- initrd=/ubninit file=/cdrom/preseed/custom.seed boot=casper text splash vga=791 xforcevesa noapic noapci nosplash irqpoll --  and simply hit Enter.
as given blow:


------------------------------------------------Enjoy-------------------------------------------------------
 

Mounting a Windows XP NTFS partition in Linux


How to access a Windows XP or Vista NTFS partition from Linux. The following tutorial explains how to gain access to a Windows NTFS partition using Linux. Reading or accessing NTFS partitions in Linux is important for many reasons. Some users repair Windows Operating environments using Linux, while others use a dual boot operating environment and would like to have access to their Windows File system.
The good news is that this is not a complicated task to accomplish. As a matter of fact, for those using a Linux version derived from Debian, (I.E. Ubuntu, Knoppix, etc…) the process can be accomplished in a matter of seconds.
How to Mount a Windows NTFS file system partition in Linux:
NOTE: In step four of the following tutorial, replace hdx1 with your actual partition found in step two. For example hda1hdb2sda1, etc.
  1. Open a terminal and type sudo su
  2. Type fdisk -l (note which partition contains the NTFS file system)
  3. Type mkdir /media/windows (This directory is where we will access the partition)
  4. Type mount /dev/hdx1 /media/windows/ -t ntfs -o nls=utf8,umask=0222
  5. Type cd /media/windows (Moves us to the windows directory)
  6. Type ls to list the files on the NTFS partition
Notes: Alternately, you can navigate to the media/windows directory outside of terminal to view the files.
To unmount the Windows NTFS partiton, from the terminal simply typeumount /media/windows/
 

Boot DOS From USB Device


Creating a DOS Bootable USB Flash drive to "Boot DOS from USB", is not very complicated. However, a tool called Rufus, created by Pete Batard, can make this task simple. Rufus can also be used to create a Bootable USB version of a given distro from an ISO File. Rufus is similar in appearance and operation to the HP USB Format tool "HPUSBFW.exe", and shares many of the same features. However, Rufus is Open Source.

Booting DOS from USB

How to Create a DOS Bootable USB Flash Drive that can ultimately be used to Run DOS from USB, using Rufus.
Authors Website: http://rufus.akeo.ie/
  1. Download Rufus and launch the program
  2. (1) Select your USB Device from the drop down, (2) Choose the Fat32filesystem, (3) Tick the option to Create a DOS bootable disk 

  1. Click the Start button to create the DOS Bootable Drive
  2. Restart your PC, setting your BIOS to boot from the USB device, boot and enjoy!


Support : BILAL SHAIKH | BILAL SHAIKH | ALL TECHNO GEEKS
Copyright © 2011. All Techno-Geeks - All Rights Reserved
Template Created by BILAL SHAIKH Published by ALL TECHNO GEEKS
Proudly powered by Blogger